Microservice Using Spring Boot, Hibernate and H2 Database
In this article, I will develop a Microservice Application using Spring Boot Framework and H2 Database and expose all CRUD (Create, Read, Update, Delete) Operations as the REST APIs.
Spring Boot Framework will serve as back-end server and I will be using Relational Database known as H2 Database, it is also known as an Embedded Java Database, for persisting(storing) the data.
By the end of this article, you would learn about how to:
- Configure Hibernate to work with Relational Database and persist the data.
- Create and Expose REST APIs for CRUD Operations using Spring Boot.
- How to handle HTTP and CORS Requests through REST Controller.
Overview
We will build a Spring Boot Rest CRUD API for a Todo Task Application in that:
- Each Todo Task has id, title, description, creation date, due date, status and comments.
- APIs help to Create, Read, Update, Delete Todo Tasks.
Below mentioned are the REST APIs for CRUD Operations.
| Description | CRUD Operation | HTTP Method | REST API Endpoint |
|---|---|---|---|
| Create New Todo Task | CREATE | POST | /todo-app/tasks/ |
| Fetch All Todo Tasks | READ | GET | /todo-app/tasks/ |
| Fetch One Todo Task | READ | GET | /todo-app/tasks/{id} |
| Update One Specific Todo Task | UPDATE | PUT | /todo-app/tasks/ |
| Delete One Specific Todo Task | DELETE | DELETE | /todo-app/tasks/{id} |
If you have no time to read this article, but want to try the code for yourself, GitHub location is provided here. Go ahead and clone the code repository.
Definitions
Spring Boot is an open source Java-based Framework used to create Microservices. It provides a good platform for Java developers to develop a stand-alone and production-grade Spring Applications that you can just run. You can get started with minimum configurations without the need for an entire Spring configuration setup.
Microservices is an architecture that allows the developers to develop and deploy services independently. Each service running has its own process and this achieves the lightweight model to support business applications. One of the most popular types of APIs for building Microservices applications is known as “RESTful API” or “REST API”.
REpresentational State Transfer (REST) is an architectural style that defines a set of constraints to be used for creating web services. REST API is a way of accessing web services in a simple and flexible way without having any processing. All communication done via REST API uses only HTTP request.
Application Programming Interface (API) is a software intermediary that allows two applications to talk to each other. To simplify, an API delivers a user requests to a system and sends the system’s response back to a user.
Prerequisites
There are some prerequisites that are required for creating the Microservice Spring Boot Application.
Familiarity with Technology and Frameworks
It is assumed that you have prior knowledge or familiarity with Java Technology, Spring, Spring Boot, Hibernate Frameworks, working with RDBMS databases and basic SQL commands, because I will not be covering the basics of these in this article.
If you are not familiar, then it is advised to get the basic knowledge of these before continuing.
JDK 1.8+
Download the latest version of the Java JDK (1.16 was the latest, at the time of writing this article) from here. Click on the downloaded .exe and complete the installation.
Since it is an Oracle Proprietary product you will need to sign-in/create Oracle Account, before downloading.
Integrated Development Environment (IDE) for Code Development
You can use any IDE of your choice. I will be using the IntelliJ IDEA Community Edition.
If you wish to use the IntelliJ IDEA Community Edition, download the latest version from here.
Click on the downloaded .exe and complete the installation.
Other related software
Webserver– Tomcat is embedded in the Spring Boot application and can be used as Webserver for running this project.
Project Management Tool (Maven)– Maven is embedded in the Spring Boot application and can be used for building and managing the Spring Boot project.
Create Base Spring Boot Application
Let me first create the Base Spring Boot Application, the basic application without any of the customization. Later I will enhance it with different methods, to include CRUD Operations and Expose REST APIs, as discussed above.
To create the Base Spring Boot Application, I use Spring Boot Initializr. This will setup the basic required pom.xml with maven dependencies and some sample Java files, so that we can run and test the application. This should help us in getting started.
Provide all the required information like: Groups, Artifacts, Name, Description, Package Name, Java Version, Dependencies (Maven) and click on Generate.
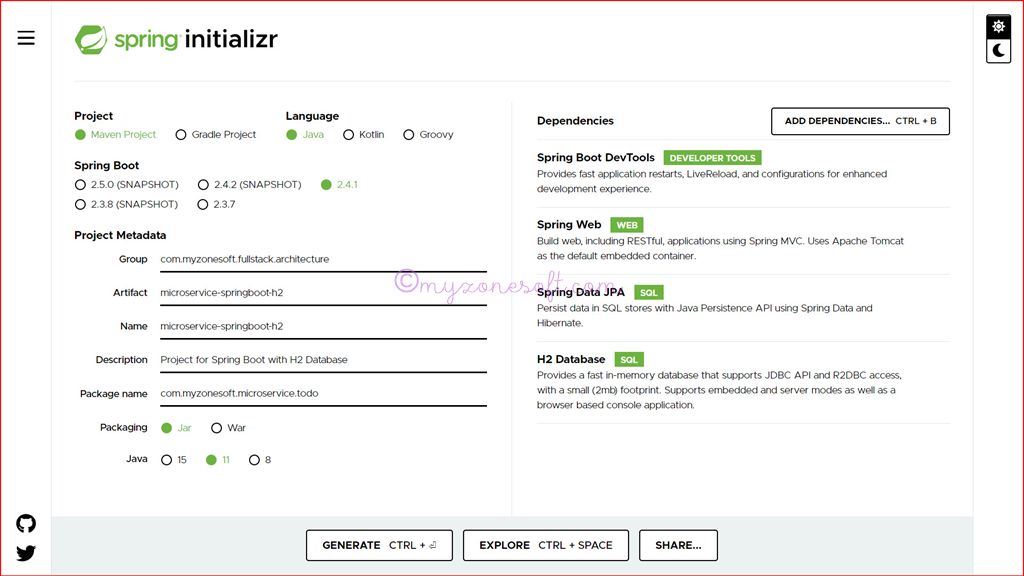
Zip file with the name, as specified in the Name field (in this case, microservice-springboot-h2.zip) will be created, that contains entire sample Spring Boot project setup.
Download it to local machine and unzip it.
Import the unzipped project into your installed IDE, as Existing Maven Project.
IDE would import the project and resolve all the Maven dependencies, by downloading them (from the Maven Central Repository, over the internet) automatically (this might take some time, based on the network speed).
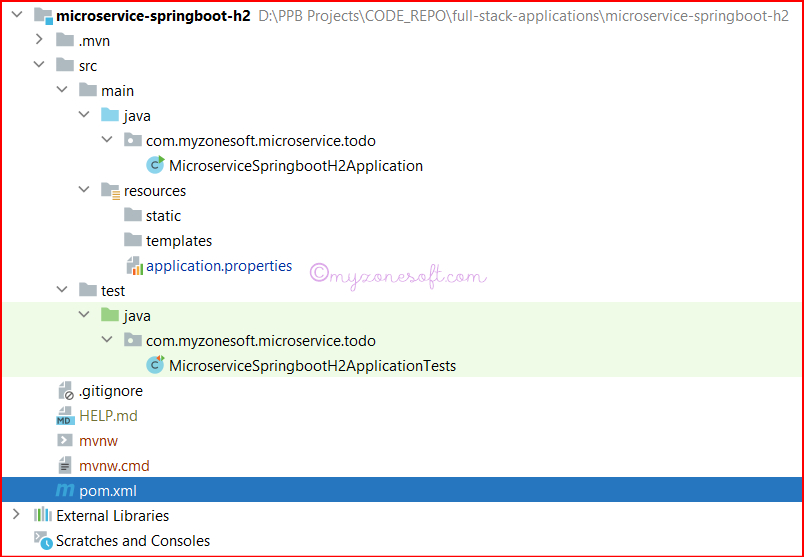
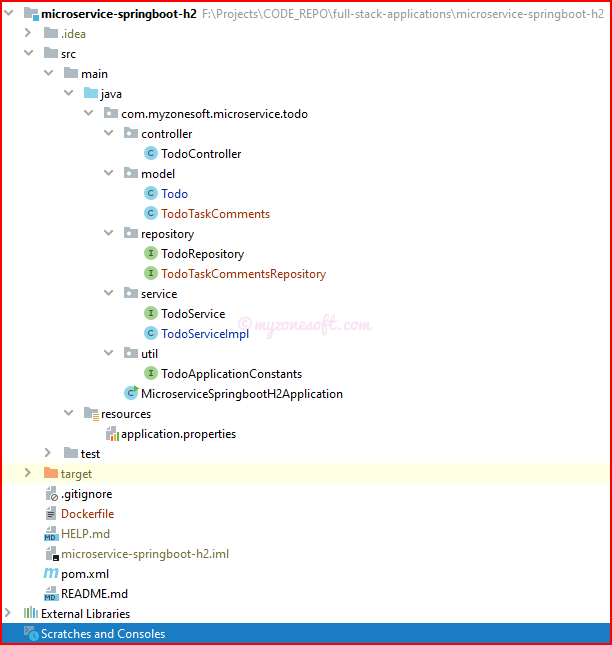
Project Structure
After all the dependencies are resolved, the project structure should be similar to below:
Java JDK is must for running the Spring Boot project. Make sure that it is installed and mapped to the project in your IDE, before launching the project.
When you try to launch the project, without correct JDK mapped in IntelliJ IDE, you get below mentioned error:

To resolve this error: Navigate to Files → Project Structure → Project Settings →Project → Project SDK and select the relevant JDK that is installed in your system, click OK
Running the Spring Boot Project
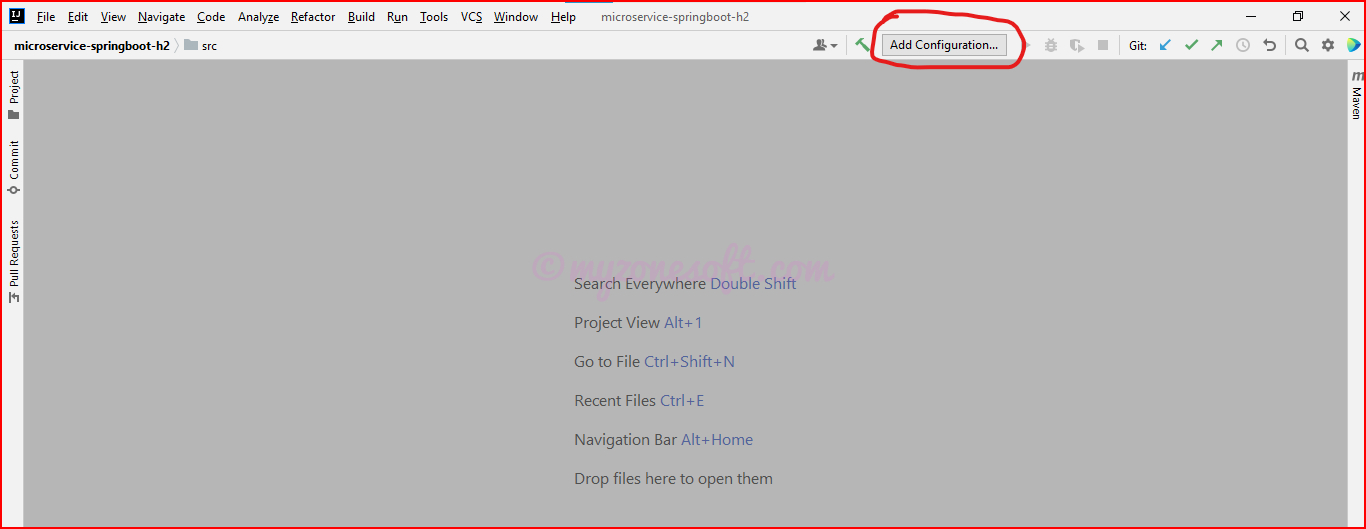
To launch your Spring Boot Projects, follow the steps given below:
-
Click on Add Configuration on top right corner, as shown below:
Configuration to add Maven inside IDE -
Click on + symbol and select Maven from dropdown list and in the Command line type:
spring-boot:runand click Apply and then click OK.
NOTE: Name and Working directory will be auto populated. you can change the Name, if you wish. -
Now, on the main project screen in the IDE, click on the Green “Play” button, next to Configuration item added, just now and your project will be launched.
If everything is setup properly, you will see that the Run window will be launched and Embedded Tomcat server will be started on Port 8080 (default port).

Go to any Browser and type – http://localhost:8080/
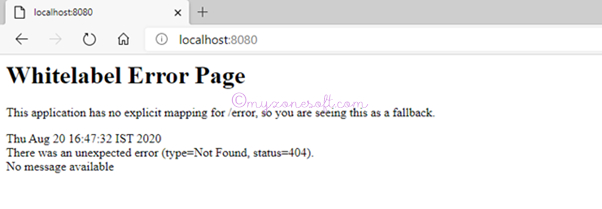
At this moment, we will see this Whitelabel Error Page, as there are no REST API endpoints configured on the Spring Boot project.
Once we configure REST API end points, this error will be resolved.
Enhance the Existing Application to Expose REST APIs
It is now time to enhance our project to include REST API endpoints, so that they can be exposed for consumption by other applications.
Final Project Structure
The final project structure will look something like this:
Add Context Path to the Spring Boot Project
The Context Path is the Prefix of a URL Path that is used to select the context(s) to which an incoming request is passed.
Currently, we have not specified any Context Path in our project, meaning API endpoints will be placed immediately after the Domain URL <hostname:port>/<api-endpoint> (like http://localhost:8080/tasks ).
However, it is always advisable to have a Context Path specific to projects, that will help in easily fetching project specific endpoints. Let us add the Context Path, relevant to this project.
It can be added in the application.properties file, located at src/main/resources/
1#=========================
2# = SERVER CONFIGURATION =
3#=========================
4server.servlet.contextPath=/todo-app/
After this change, the endpoint looks like: http://localhost:8080/todo-app/tasks and the response we receive from the server, would still remain same.
Adding Database
We will first setup the database for persisting the data. I will be using the Relational Database known as H2 Database. It is called the Java SQL database. You can extend this to use any other Relational Database and only Database configurations needs to be changed.
The main features of H2 are:
- Very fast, open source, JDBC API
- Embedded and server modes; in-memory databases
- Browser based Console application
- Small footprint: around 2 MB jar file size
H2 Database should be used for development and testing purpose only.
The reason why it should not be used as a database in production of bigger projects are mentioned below:
- It has very bad concurrent behavior (writing a row locks the whole table, therefore deadlocks are much more frequent).
- Missing features and optimizations.
- It has a poor query optimizer.
- Limited size of the database.
I will using the Embedded Version of the H2 Database. We will use Hibernate to interact with the Database.
For completing this setup, we will need to update/create few files/classes. Let us go ahead and complete that.
Update pom.xml
Add the H2 Database and JPA related dependencies in the pom.xml (if not added already during project initialization here)
1<dependency>
2	<groupId>org.springframework.boot</groupId>
3	<artifactId>spring-boot-starter-data-jpa</artifactId>
4</dependency>
5<dependency>
6	<groupId>com.h2database</groupId>
7	<artifactId>h2</artifactId>
8</dependency>
Update the /src/main/resources/application.properties
To add the H2 configurations to the Hibernate settings.
1spring.datasource.url=jdbc:h2:mem:todo-app
2spring.datasource.username=root
3spring.datasource.password=
4spring.datasource.driver-class-name=org.h2.Driver
5spring.h2.console.enabled=true
6spring.jpa.properties.hibernate.dialect=org.hibernate.dialect.H2Dialect
7spring.jpa.show-sql=true
8spring.jpa.hibernate.ddl-auto=create-drop
Let us look at some of the values that are used for configuring Database.
- Datasource URL, username, password and driver class are required for connecting to database.
todo-appis the name of my database.jdbc:h2:memrepresents embedded in-memory database.
spring.h2.console.enabled=true– This enables us to use the H2 console on the browser.spring.jpa.properties.hibernate.dialect– We need to provide the dialect for Hibernate. The dialect specifies the type of database used in hibernate so that hibernate can generate appropriate type of SQL statements.spring.jpa.show-sql- Show the SQL query logs or not. Values aretrueorfalse.spring.jpa.hibernate.ddl-autois used to validate and export schema DDL to the database when the SessionFactory is created. It takes following values:create– Hibernate first drops the existing tables data and structure, then creates new tables and executes the operations on the newly created tables. With create, we will lose existing table data.validate– Hibernate only validates the table structure, whether the table and columns have existed or not. If the table doesn’t exist then hibernate throws an exception. Validate is the default value.update– Hibernate checks for the tables and columns. If a table doesn’t exist then it creates new tables and where as if a column doesn’t exist it creates new columns for it. Hibernate doesn’t drop any existing tables, so that we don’t lose existing table data.create-drop– Hibernate first checks for a table and do the necessary operations, if not found creates new tables and finally drops the table after all the operations were completed. This is useful in running unit and integrations tests.
Once the above configuration changes are complete, Restart the Spring Boot Application and next time when Tomcat server starts, it would have created H2 Database.
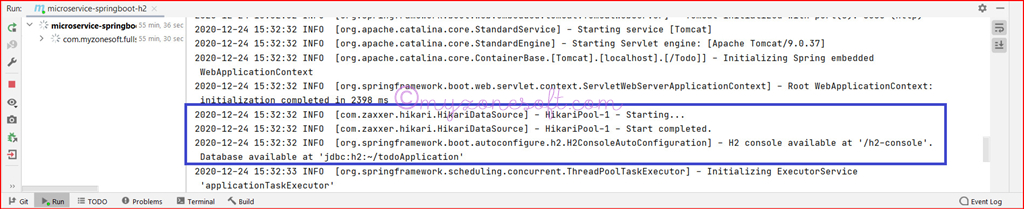
Open any browser and type in http://localhost:8080/todo-app/h2-console, you get the H2 Console Login Screen similar to below:
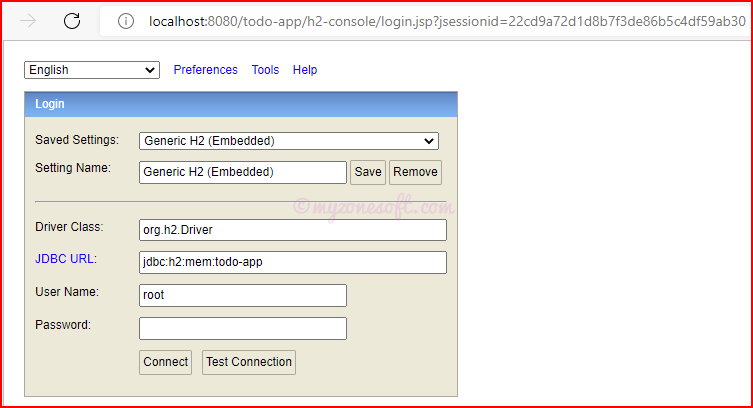
Since we have spring.datasource.password field BLANK in the application.properties, no need to enter the password and you can either click on Test Connection or Connect.
Now that database is setup and ready, let us create some entities and interfaces to interact with them.
POJO Model Classes
Plain Old Java Object(POJO) Model Classes are an ordinary Java Objects, not bound by any special restriction other than those forced by the Java Language Specification and not requiring any classpath.
A POJO Class should not:
- Extend any prespecified classes.
- Implement prespecified interfaces.
POJOs basically defines an entities in Hibernate, which in turn defines the tables in the databases.
model.Tasks
 1@Entity
 2public class Tasks {
 3    @Id
 4    @GeneratedValue(strategy = GenerationType.AUTO)
 5    private Long systemTasksId;
 6    private String title;
 7    private String description;
 8    private LocalDate creationDate;
 9    private LocalDate dueDate;
10    private String status;
11
12    @JsonManagedReference
13    @OneToMany(mappedBy = "todoTask", fetch = FetchType.EAGER)
14    private Set<TodoTaskComments> todoTaskCommentsSet;
15
16    //Empty Constructor
17    //Constructor with all fields
18    //Getters and Setters
19    //toString method for converting POJO to string
20}
Some of the Hibernate Annotations used in the above code are explained below:
@Entity– Letting the Hibernate know that this POJO Model Class is to be converted to Table in the database and its private variables into Columns of that Table.@Id– To identify the primary key of the table.@GeneratedValue(strategy = GenerationType.AUTO)– To Auto Generate the sequence for the Primary Key. There are different strategies available, based on the database that is used.@JsonManagedReference- This is required to avoid the “Could not write JSON: Infinite recursion (StackOverflowError); nested exception”. Where in, the output goes into infinite recursive loop and eventually StackOverflowError error is thrown. This annotation requires@JsonBackReferenceto be added on the referenced variable of the back reference class (more on this below).@OneToMany- Each Todo task can have many comments.- So there is a One-To-Many relationship between Todo POJO Model Class and TodoTaskComments POJO Model Class.
- We are using
mappedByattribute, where we inform the Hibernate which variable is responsible for updating this relationship.
model.TodoTaskComments
 1@Entity
 2public class TodoTaskComments {
 3    @Id
 4    @GeneratedValue(strategy = GenerationType.AUTO)
 5    private Long todoTaskCommentsId;
 6
 7    private String taskComments;
 8    private LocalDate creationDate;
 9
10    @JsonBackReference
11    @ManyToOne(fetch = FetchType.EAGER)
12    @JoinColumn(name="systemTasksId", nullable=false)
13    private Tasks todoTask;
14
15    //Empty Constructor
16    //Constructor with all fields
17    //Getters and Setters
18    //toString method for converting POJO to string
19}
Some of the Hibernate Annotations used in the above code are explained below:
@JsonBackReference- As explained above, this is used for referring the Back Reference Class.@ManyToOne- Reverse mapping for the OneToMany explained above.@JoinColumn- Refers to the Primary Key of the Main Model Class.
JPA Repository Interfaces
Spring Boot JPA is a Java specification for managing relational data in Java applications. It allows us to access and persist data between Java Objects/Classes and Relational Databases.
In Spring Boot, it is enough to create a Repository Interface extending the JPA Repository Interfaces to have CRUD operations on the POJO Model Classes. There should be only one Repository Interface per POJO Model Class. These Interfaces act as Data Transfer Object(DTO) Classes.
repository.TasksRepository
1@Repository
2public interface TasksRepository extends JpaRepository<Tasks, Long> { }
Some of the Hibernate Annotations used in the above code are explained below:
@Repository- This Hibernate Annotation represents this interface as the Repository, meaning a Data Transfer Object(DTO) Class.- This interface extends
org.springframework.data.jpa.repository.JpaRepository. - We need to provide the name of the POJO Model Class and the Data type of the Primary Key of that POJO Model Class.
repository.TodoTaskCommentsRepository
1@Repository
2public interface TodoTaskCommentsRepository extends JpaRepository<TodoTaskComments, Long> { }
Now if we login to the H2 database, we see the below schema:
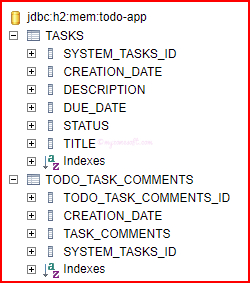
In the above schema, if we observe carefully, since in our OneToMany Relationship mapping(in the Tasks Model Class), we have specified mappedBy = "todoTask" attribute and @JoinCoulmn in the TodoTaskComments Model Class, there is No Column created for TodoTaskComments in the Tasks table.
However in the TodoTaskComments table, we have a Column called systemTasksId, which maps to systemTasksId Column in Tasks table.
Now, with this basic understanding of how Models, Entities and Tables mapping works in Hibernate, let us move on and add some REST API Endpoints.
Add REST API Endpoint for CREATE Operation
| Description | CRUD Operation | HTTP Method | REST API Endpoint |
|---|---|---|---|
| Create New Todo Task | CREATE | POST | /todo-app/tasks/ |
For creating this endpoint, we would need to create following classes:
- Service Class =
service.TodoService
 1@Service
 2public class TodoService {
 3
 4    //Autowired the JPA Repository
 5    @Autowired
 6    private TasksRepository tasksRepository;
 7
 8    @Autowired
 9    private TodoTaskCommentsRepository todoTaskCommentsRepository;
10
11    public Tasks createOrUpdate(Tasks task) {
12        //Get the list of TodoTaskComments from the Request Body
13        Set<TodoTaskComments> todoTaskCommentsSet = task.getTodoTaskCommentsSet();
14
15        //Save the TodoTaskComments before task can be saved
16        if(todoTaskCommentsSet != null) {
17            for (TodoTaskComments todoTaskComments : todoTaskCommentsSet) {
18                if (todoTaskComment != null && !todoTaskComment.getTaskComments().isEmpty()) {
19                    todoTaskComments.setTodoTask(task);
20                    todoTaskComments.setCreationDate(LocalDate.now());
21                    todoTaskCommentsRepository.save(todoTaskComments);
22                }
23            }
24        }
25
26        //Set the Creation Date only during initial creation of the task
27        if(task.getCreationDate() == null)
28            task.setCreationDate(LocalDate.now());
29
30        task = tasksRepository.save(task);
31        return task;
32    }
33
34    public List<String> getTodoStatusAsList() {
35        List<String> taskStatusList = Stream.of(TASK_STATUS.values()).map(TASK_STATUS::name).collect(Collectors.toList());
36        return taskStatusList;
37    }
38}
- Util Interface, for storing all the constants, enums and other values=
util.TodoApplicationConstants
1public interface TodoApplicationConstants {
2    //Enums
3    enum TASK_STATUS {NOT_STARTED, IN_PROGRESS, ON_HOLD, COMPLETED, DEFERRED}
4}
- Controller Class, for exposing the REST APIs =
controller.TodoController
 1@RequestMapping("/tasks")
 2@RestController
 3public class TodoController {
 4    @Autowired
 5    private TodoService todoService;
 6
 7    @PostMapping
 8    public ResponseEntity<Tasks> createTodoTask(@RequestBody Tasks task) {
 9        task = todoService.createOrUpdate(task);
10        return new ResponseEntity<>(task, HttpStatus.CREATED);
11    }
12}
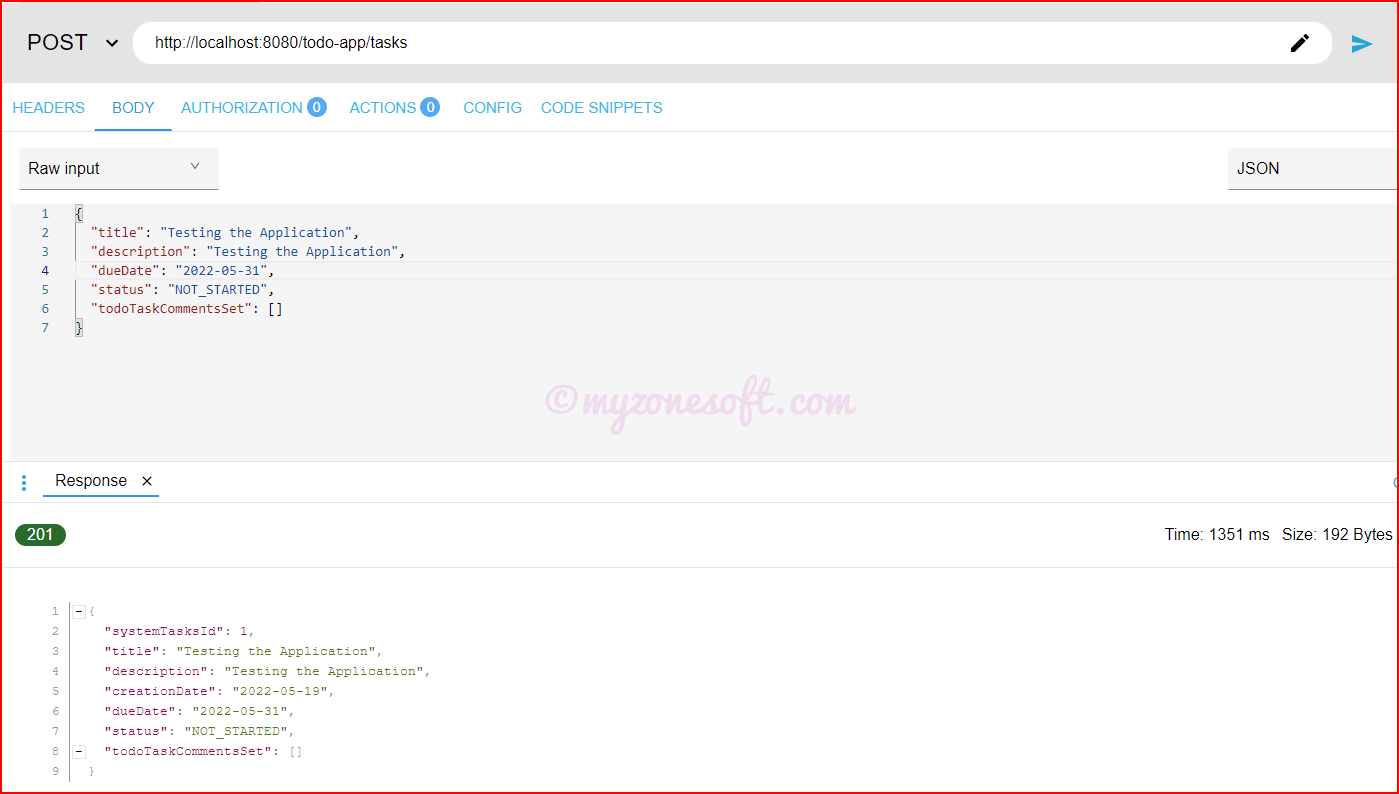
Now, Open any REST client and provide values, as per the below table and see the response from the server.
| HTTP Method | POST |
| Endpoint URL | http://localhost:8080/todo-app/tasks |
| Request Header | Content-type: application/json |
| Request Body | { |
Add REST API Endpoint for GET All Operation
| Description | CRUD Operation | HTTP Method | REST API Endpoint |
|---|---|---|---|
| Fetch All Todo Tasks | READ | GET | /todo-app/tasks/ |
For creating this endpoint, we would need to update following classes:
- Service Class =
service.TodoService
1public List<Tasks> findAll() {
2    List<Tasks> tasksList = tasksRepository.findAll();
3    return tasksList;
4}
- Controller Class =
controller.TodoController
1@GetMapping
2public ResponseEntity<List<Tasks>> getAllTasks() {
3    try {
4        List<Tasks> tasksList = todoService.findAll();
5        return new ResponseEntity<>(tasksList, HttpStatus.OK);
6    } catch (Exception ex) {
7        return new ResponseEntity<>(null, HttpStatus.INTERNAL_SERVER_ERROR);
8    }
9}
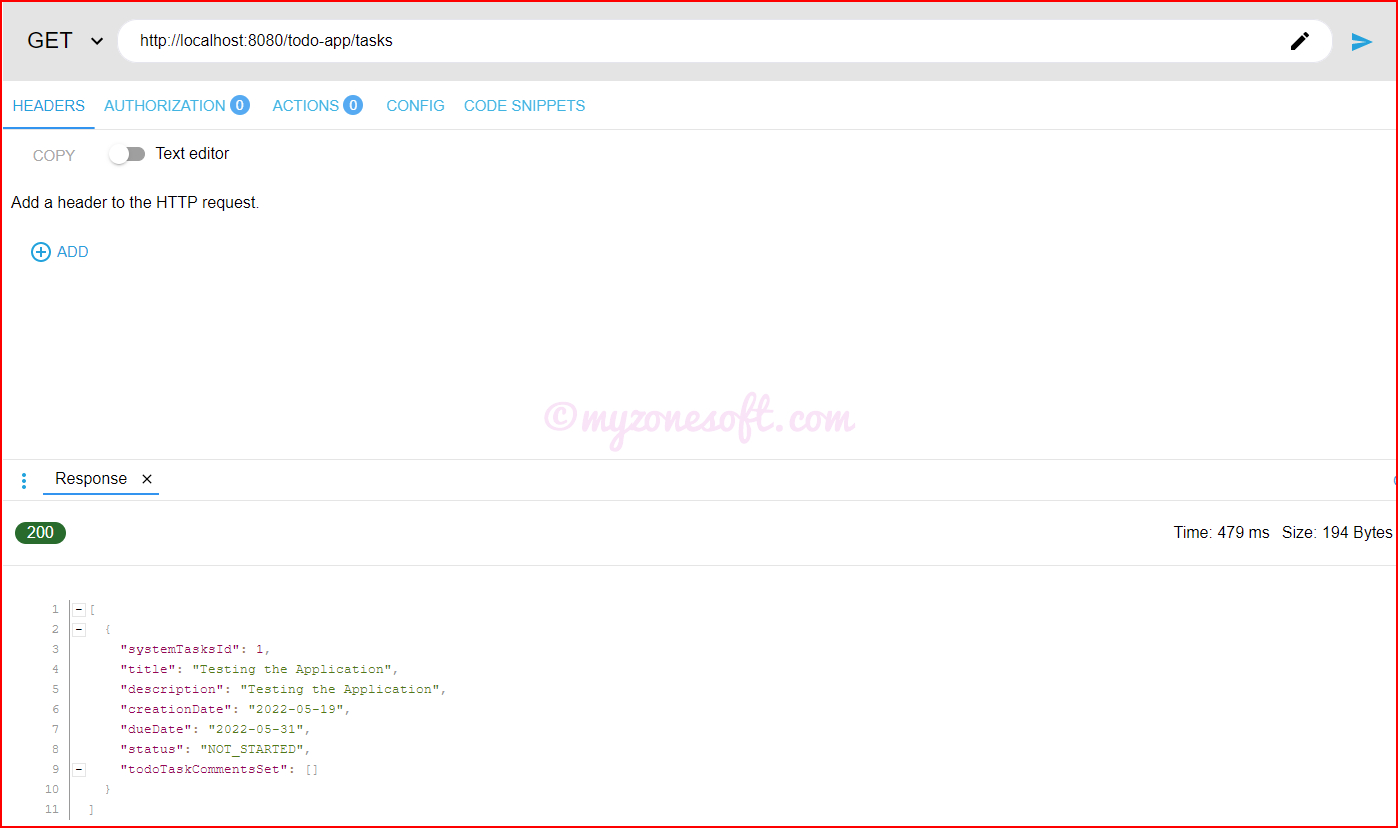
Now, Open any REST client and provide values, as per the below table and see the response from the server.
| HTTP Method | Endpoint URL |
|---|---|
| GET | http://localhost:8080/todo-app/tasks |
Add REST API Endpoint for GET Operation
| Description | CRUD Operation | HTTP Method | REST API Endpoint |
|---|---|---|---|
| Fetch One Todo Task | READ | GET | /todo-app/tasks/{id} |
For creating this endpoint, we would need to update following classes:
- Service Class =
service.TodoService
1public Optional<Tasks> findById(long id) {
2    Optional<Tasks> task = tasksRepository.findById(id);
3    return task;
4}
- Controller Class =
controller.TodoController
1@GetMapping("/{id}")
2public ResponseEntity<Tasks> getTasksById(@PathVariable("id") long id) {
3    Optional<Tasks> task = todoService.findById(id);
4    if (task.isPresent()) {
5        return new ResponseEntity<>(task.get(), HttpStatus.OK);
6    } else {
7        return new ResponseEntity<>(null, HttpStatus.NOT_FOUND);
8    }
9}
Now, Open any REST client and provide values, as per the below table and see the response from the server.
| HTTP Method | Endpoint URL |
|---|---|
| GET | http://localhost:8080/todo-app/tasks/1 |

Add REST API Endpoint for UPDATE Operation
| Description | CRUD Operation | HTTP Method | REST API Endpoint |
|---|---|---|---|
| Update One Specific Todo Task | UPDATE | PUT | /todo-app/tasks/ |
For creating this endpoint, we would need to update following classes:
- Controller Class =
controller.TodoController
1@PutMapping
2public ResponseEntity<Tasks> updateTaskItem(@RequestBody Tasks task) {
3    task = todoService.createOrUpdate(task);
4    return new ResponseEntity<>(task, HttpStatus.OK);
5}
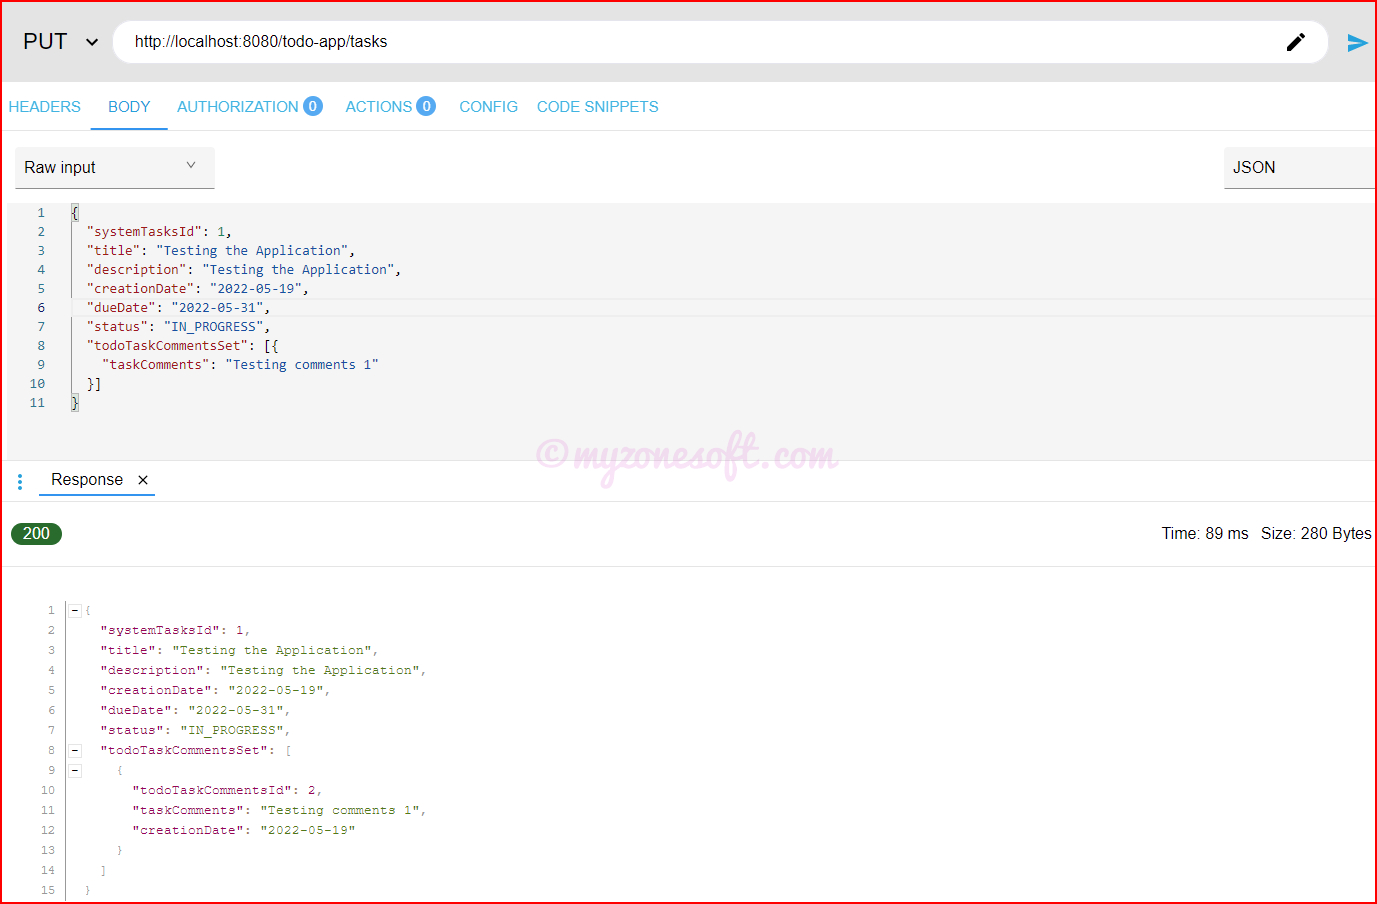
| HTTP Method | PUT |
| Endpoint URL | http://localhost:8080/todo-app/tasks |
| Request Header | Content-type: application/json |
| Request Body | { |
Add REST API Endpoint for DELETE Operation
| Description | CRUD Operation | HTTP Method | REST API Endpoint |
|---|---|---|---|
| Delete One Specific Todo Task | DELETE | DELETE | /todo-app/tasks/{id} |
For creating this endpoint, we would need to update following classes:
- Service Class =
service.TodoService
 1public boolean deleteById(long id) {
 2    boolean isDeleted = false;
 3    try {
 4        //Delete the TaskComments before deleting the tasks.
 5        Optional<Tasks> deletionTask = findById(id);
 6        if(deletionTask.isPresent()) {
 7            Set<TodoTaskComments> todoTaskCommentsSet = deletionTask.get().getTodoTaskCommentsSet();
 8            if (todoTaskCommentsSet != null) {
 9                for (TodoTaskComments todoTaskComments : todoTaskCommentsSet) {
10                    todoTaskCommentsRepository.delete(todoTaskComments);
11                }
12                tasksRepository.delete(deletionTask.get());
13                isDeleted = true;
14            }
15        }
16    } catch (Exception ex) {
17        ex.getMessage();
18    }
19    return isDeleted;
20}
- Controller Class =
controller.TodoController
 1@DeleteMapping("/{id}")
 2public ResponseEntity<HttpStatus> deleteTaskById(@PathVariable("id") long id) {
 3    try {
 4        if(todoService.deleteById(id))
 5            return new ResponseEntity<>(HttpStatus.NO_CONTENT);
 6        else
 7            return new ResponseEntity<>(null, HttpStatus.NOT_FOUND);
 8    } catch (Exception ex) {
 9        return new ResponseEntity<>(null, HttpStatus.INTERNAL_SERVER_ERROR);
10    }
11}
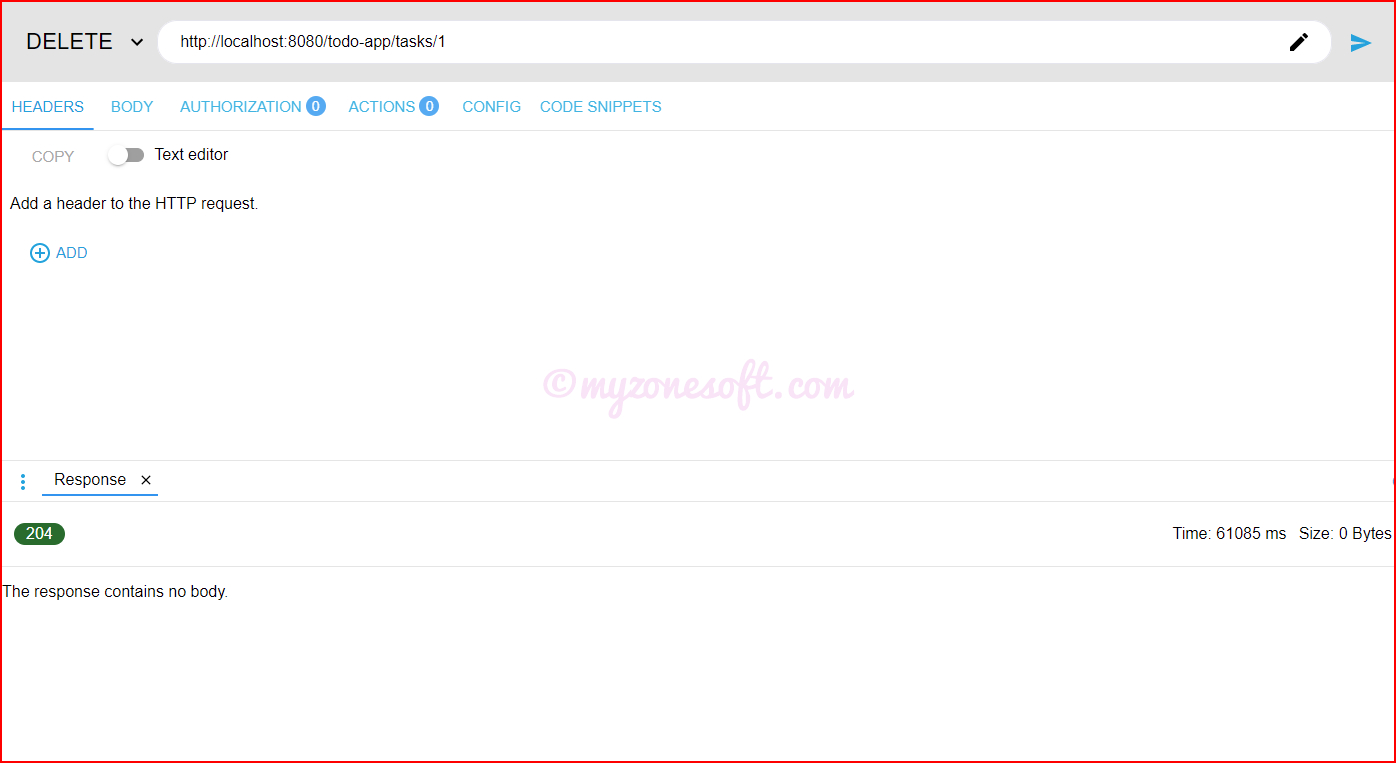
Now, Open any REST client and provide values, as per the below table
| HTTP Method | Endpoint URL |
|---|---|
| DELETE | http://localhost:8080/todo-app/tasks/1 |
Response from the Server
Configure Spring Boot to Handle CORS Request
By default, the Spring Boot REST API which is running on http://localhost:8080/, will not allow requests from frontend applications through domains like http://localhost:3000/.
This is called CORS (Cross-Origin Resource Sharing) policy, where in by default, servers block request coming from other servers or domains.
Let’s configure Rest Resource to allow access from specific server(s), in order to allow our frontend applications(will be developed later) to make REST APIs calls to this Spring Boot Server.
- Update the Rest Controller =
controller.TodoController, to allow request from our frontend applications(http://localhost:3000/).
1@CrossOrigin(origins = { "http://localhost:3000" })
2@RequestMapping("/tasks")
3@RestController
4public class TodoController {
5    //Other Codes
6}
Conclusion
With these endpoints’ setup, we have come to an end of this article and we have enabled CRUD (Create, Read, Update, Delete) Operations using below REST API Endpoints and they are ready to be consumed by any frontend or other microservice applications.
| Description | CRUD Operation | HTTP Method | REST API Endpoint |
|---|---|---|---|
| Create New Todo Task | CREATE | POST | /todo-app/tasks/ |
| Fetch All Todo Tasks | READ | GET | /todo-app/tasks/ |
| Fetch One Todo Task | READ | GET | /todo-app/tasks/{id} |
| Update One Specific Todo Task | UPDATE | PUT | /todo-app/tasks/ |
| Delete One Specific Todo Task | DELETE | DELETE | /todo-app/tasks/{id} |
Through this article, you have learned about how to:
- Configure Hibernate to work with Relational Database and persist the data.
- Create and Expose REST APIs for CRUD Operations using Spring Boot.
- Handle HTTP and CORS Requests through REST Controller.
Complete code for this project can be found at GitHub here.
Instructions on how to clone the code repository and run the project are provided on the GitHub project page.